Adding a post to a page in WordPress is simple. First, you need to understand the steps.
WordPress is a powerful tool for creating websites and blogs. It allows you to manage content easily. Adding posts to pages is one of its core features. This function helps keep your site organized and engaging. Whether you are a beginner or have some experience, this guide will help you.
It will walk you through the process step by step. You will learn how to add a new post and link it to a page. By the end, you will be more confident in managing your WordPress site. Let’s get started!
Introduction To WordPress
WordPress is a popular content management system (CMS). It helps people create websites and blogs easily. Many use WordPress because it is user-friendly and flexible. Let’s dive into what WordPress is and its benefits.
What Is WordPress?
WordPress started as a blogging platform in 2003. Today, it powers over 40% of all websites on the internet. It is an open-source platform, which means it is free to use and customize. There are two versions of WordPress:
- WordPress.com: A hosted service where WordPress takes care of the hosting for you.
- WordPress.org: A self-hosted service where you need to find your own web hosting provider.
WordPress.org offers more flexibility and control over your website. You can install themes and plugins to extend the functionality of your site. These themes and plugins can be free or paid.
Benefits Of Using WordPress
There are several benefits to using WordPress:
- Ease of Use: WordPress is easy to learn, even for beginners. You don’t need to know how to code to create a beautiful website.
- Flexibility: You can create any type of website with WordPress. This includes blogs, business sites, e-commerce stores, portfolios, and more.
- SEO-Friendly: WordPress is built with search engine optimization (SEO) in mind. This means your site can rank higher in search engine results.
- Large Community: There is a large community of developers and users. You can find help and resources easily.
- Regular Updates: WordPress is updated regularly to improve security and functionality.
Using WordPress helps you build a professional website without much effort. Its wide range of themes and plugins allows for endless customization.
Credit: www.hostinger.com
Setting Up Your WordPress Site
Setting up your WordPress site is the first step to sharing content online. It’s easy and doesn’t take much time. Follow these steps to get started.
Choosing A Domain And Hosting
First, you need a domain name. This is your website’s address. Choose something simple and related to your site’s content. Then, pick a hosting provider. The hosting provider stores your website files. Popular options are Bluehost, SiteGround, and HostGator. They offer good support and are beginner-friendly.
Installing WordPress
Once you have a domain and hosting, install WordPress. Most hosting providers offer a one-click WordPress install. Log into your hosting account. Find the WordPress install option. Click to start the installation. Follow the prompts to complete it. You’ll set up an admin account during this step. This is how you’ll log into your WordPress dashboard.
After installation, log into your WordPress dashboard. Use the admin account you created. Now, your WordPress site is live. You can start adding content and customizing it.
Navigating The WordPress Dashboard
The WordPress dashboard is your central hub. It is where you manage your website. Familiarizing yourself with its features is essential. This guide will help you navigate the dashboard with ease.
Overview Of Dashboard Features
The dashboard is the first screen you see after logging in. It gives you a quick overview of your website. Here are some key features:
- At a Glance: Shows a summary of your site’s content.
- Activity: Displays recent posts and comments.
- Quick Draft: Allows you to write a quick post draft.
- WordPress News: Updates from the WordPress community.
Customizing Your Dashboard
You can customize the dashboard to fit your needs. Here’s how:
- Screen Options: Click on “Screen Options” in the top right corner. You can choose which boxes to display.
- Drag and Drop: Rearrange the boxes by dragging and dropping them.
- Plugins: Install plugins to add new features to your dashboard.
Customizing the dashboard helps you focus on what matters most. It makes managing your site more efficient.

Credit: www.youtube.com
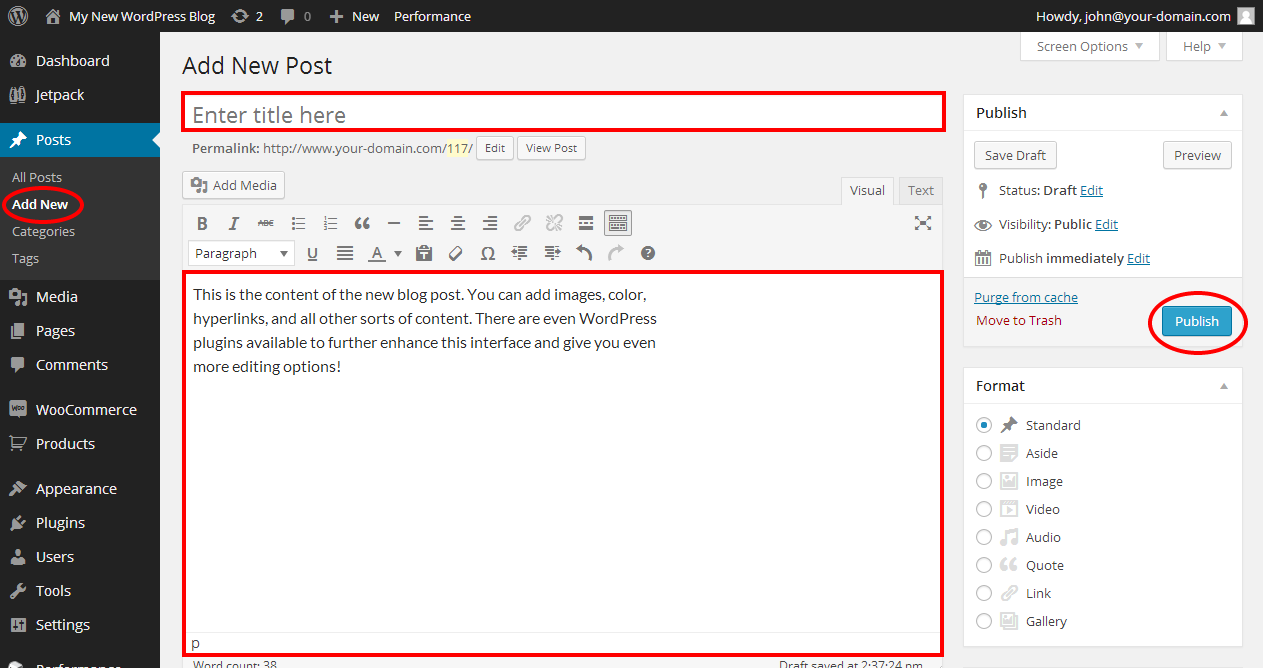
Creating A New Post
Easily add a new post to a WordPress page by navigating to the dashboard. Click “Posts” then “Add New” to begin. Customize your post with text, images, and links before hitting “Publish. “
Creating a new post in WordPress is a straightforward process. It allows you to share updates, articles, or any content with your audience. By following a few steps, you can have your post live in no time.Accessing The Post Editor
First, log in to your WordPress dashboard. Look for the menu on the left side. Click on “Posts” and then “Add New”. You will see the post editor screen. This is where you will write and format your post.Writing And Formatting Your Post
Start by entering a title for your post in the title box. Make it clear and relevant. Next, move to the main content area. This is where you will write your content. Use short sentences. Keep paragraphs brief. To format text, use the toolbar above the content area. You can make text bold, italic, or add links. You can also create lists or change text alignment. To add images, click on “Add Media”. Choose an image from your library or upload a new one. Remember to add categories and tags. These help organize your content. Once you’re done, preview your post to check how it looks. If satisfied, click “Publish”. Your post is now live.Adding Media To Your Post
Adding media to your post can make it more engaging. Media includes images, videos, and other types of content. In WordPress, it’s easy to add media to your posts. This guide will walk you through the process.
Uploading Images And Videos
Images and videos can make your posts more appealing. To upload images and videos:
- Click on the Add Media button above the text editor.
- Select Upload Files tab.
- Click Select Files to upload from your computer.
- Choose the file you want to add.
- Click Insert into post to add the media to your post.
Ensure your images and videos are optimized for web use. This helps in improving page load time.
Embedding Media From External Sources
Sometimes, you might want to embed media from other sites. WordPress makes this simple. Here’s how:
- Find the URL of the media you want to embed.
- Copy the URL.
- In the WordPress editor, paste the URL where you want the media to appear.
WordPress will automatically embed the media. This works with YouTube, Vimeo, Twitter, and many other sites.
Embedding from external sources can save storage space on your server. It also allows for easy updates. Make sure to use trusted sources for embedding media.
Publishing Your Post
Publishing your post on WordPress is easy. Follow these steps to make your content live. You can control who sees your post and when it goes live. Let’s dive into the details.
Setting Post Visibility
WordPress lets you choose who can see your post. You can set your post to be public, private, or password-protected. Public posts are visible to everyone. Private posts are only visible to you and site administrators. Password-protected posts require a password to view.
To set post visibility, find the “Visibility” option in the “Publish” box. Click “Edit” next to “Visibility”. Choose the option that suits your needs. Click “OK” to save your choice.
Scheduling Posts
WordPress allows you to schedule posts for future publication. This helps you plan your content in advance. You can set a specific date and time for your post to go live.
To schedule a post, find the “Publish immediately” option in the “Publish” box. Click “Edit” next to it. Set the desired date and time for your post. Click “OK” to save your schedule. Finally, click the “Schedule” button to confirm.
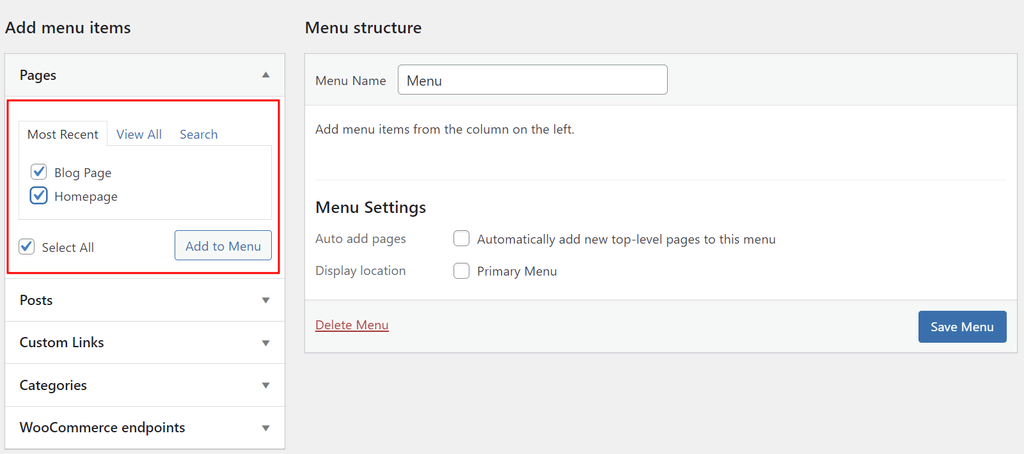
Adding Posts To Pages
Adding posts to pages in WordPress can seem confusing at first. But, with a few simple steps, you can easily display your latest posts on any page you choose. This guide will help you understand how to create a blog page and assign posts to it. Let’s get started!
Creating A Blog Page
First, you need to create a page where your posts will appear. Follow these steps:
- Log in to your WordPress dashboard.
- Navigate to the Pages section.
- Click on Add New to create a new page.
- Enter a title for your page, like Blog or News.
- Click Publish to save your new page.
Your blog page is now created. Next, you need to assign your posts to this page.
Assigning Posts To Pages
To show your posts on the new page, follow these steps:
- Go to Settings in your WordPress dashboard.
- Select Reading from the menu.
- Under Front page displays, choose A static page.
- In the Posts page dropdown, select the page you created for your posts.
- Click Save Changes to update your settings.
Your posts will now appear on the page you selected. This makes it easy for visitors to find your latest content.
Customizing Post Layout
Customizing the layout of your WordPress posts can enhance user experience. It helps your content stand out. There are several ways to customize your post layout. Below are some essential methods to get you started.
Choosing Themes And Templates
Themes and templates define the look and feel of your website. Each theme offers different layout options. To choose a theme:
- Go to your WordPress dashboard.
- Navigate to Appearance and then Themes.
- Select Add New to browse available themes.
- Preview and activate the theme that fits your needs.
Many themes come with pre-built templates. These templates can help you arrange your posts. You can find templates under the Page Attributes section when editing a post.
Using Widgets And Plugins
Widgets and plugins can enhance your post layout. They add functionality and design elements. To add widgets:
- Go to your WordPress dashboard.
- Navigate to Appearance and then Widgets.
- Drag and drop widgets into your sidebar or footer.
Plugins offer more advanced customization. Some popular plugins for post layout include:
- Elementor: Drag-and-drop page builder.
- WPBakery: Customizable content elements.
- Beaver Builder: User-friendly layout control.
To install a plugin:
- Go to your WordPress dashboard.
- Navigate to Plugins and then Add New.
- Search for the desired plugin and click Install Now.
- Activate the plugin to start using it.
Using these tools, you can create a unique and engaging post layout. This will improve your site’s appearance and functionality.
Optimizing Your Post For Seo
Optimizing your post for SEO is essential for increasing visibility and driving traffic. By focusing on key elements, you can ensure your post ranks higher on search engines. Let’s explore some effective strategies for improving your SEO.
Using Keywords Effectively
Keywords are crucial for SEO. They help search engines understand your content. Follow these steps to use keywords effectively:
- Identify relevant keywords: Use tools like Google Keyword Planner.
- Incorporate keywords naturally: Place them in the title, headings, and throughout the content.
- Avoid keyword stuffing: Maintain a natural flow of text.
Here’s an example of how to structure your content:
How to Add a Post to a Page in WordPress
Adding a post to a page in WordPress is simple. Follow these steps.
Adding Meta Descriptions
Meta descriptions provide a summary of your post. They appear below the title in search results. A compelling meta description can increase click-through rates. Here’s how to create effective meta descriptions:
- Keep it concise: Limit to 150-160 characters.
- Include primary keywords: Make sure the keywords are relevant.
- Write a call to action: Encourage readers to click.
Example of a meta description:
Remember, optimizing your post for SEO is an ongoing process. Stay updated with the latest trends and adjust your strategies accordingly.
Managing And Editing Posts
Managing and editing posts in WordPress is crucial for maintaining fresh and accurate content. This section will guide you on how to update published posts and handle post revisions.
Updating Published Posts
Updating your posts is simple. Follow these steps to keep your content current:
- Log in to your WordPress dashboard.
- Navigate to Posts and click All Posts.
- Find the post you want to update and click Edit.
- Make the necessary changes.
- Click Update to save your changes.
Updating posts can improve SEO and keep your readers engaged. Make sure to update outdated information regularly.
Handling Post Revisions
WordPress automatically saves post revisions. You can revert to an earlier version if needed. Here’s how:
- Go to the post you want to edit.
- Click Edit to open the post.
- On the right side, find the Revisions section.
- Click on the desired revision to view it.
- Compare it with your current version.
- Click Restore This Revision if you want to revert.
Using revisions helps you recover lost content and track changes over time. This feature is especially useful for collaborative blogs.
Credit: www.bluehost.com
Frequently Asked Questions
How Do I Add A New Post In WordPress?
Go to the Dashboard. Click on “Posts” and then “Add New. “
Can I Add A Post To A Specific Page?
Yes. Use categories or tags, then link them to the page.
How Do I Assign Categories To Posts?
In the post editor, find the “Categories” box. Check the relevant category.
What Are Tags In WordPress?
Tags are keywords you assign to posts. They help organize and find content.
How Do I Create A Category In WordPress?
Go to “Posts,” then “Categories. ” Add a new category with a name.
Can I Add Images To My Post?
Yes. Click “Add Media” in the post editor. Upload or select an image.
How Do I Publish A Post In WordPress?
After writing your post, click the “Publish” button on the right side.
How Do I Edit A Post After Publishing?
Go to “Posts,” find your post, click “Edit,” and make changes.
What Is The Difference Between Posts And Pages?
Posts are time-based entries. Pages are static and not time-sensitive.
How Can I Organize My Posts Better?
Use categories and tags. Create menus and widgets for easy navigation.
Conclusion
Adding a post to a page in WordPress is simple. Follow the steps outlined above. Start by creating a new post. Assign it to the desired page. Use the block editor for flexibility. Customize your content for better engagement. Consistent practice will improve your skills.
Keep your audience in mind. This ensures relevant content. Stay patient and persistent. Success will follow. Happy blogging!