Editing the primary bar in Divi WordPress can seem tricky at first. But with the right steps, it becomes easy.
This guide will help you edit your site’s primary bar with ease. The primary bar is a key part of your website’s layout. It holds the main menu and often the logo. Customizing it can improve user experience and site appearance.
You may want to change its color, font, or size. Or maybe you need to add or remove items from the menu. In this blog post, you’ll learn how to do all these things step-by-step. By the end, your primary bar will look just how you want it. Let’s dive in and start editing!
Credit: diviextended.com
Introduction To Divi Theme
The Divi Theme is a popular WordPress theme known for its flexibility and user-friendly design. It offers a drag-and-drop builder, making it easy for anyone to create beautiful websites. In this guide, we’ll explore how to edit the primary bar in Divi.
What Is Divi?
Divi is a WordPress theme developed by Elegant Themes. It comes with a visual builder that allows you to create custom layouts for your website. Divi is suitable for both beginners and experienced developers.
Benefits Of Using Divi
There are many benefits to using Divi:
- Drag-and-Drop Builder: Easily customize your site without coding skills.
- Pre-made Layouts: Choose from hundreds of pre-designed templates.
- Responsive Design: Ensure your site looks great on all devices.
- Customizable Elements: Modify every aspect of your site, from headers to footers.
Using Divi, you can create a professional website quickly and efficiently. Its user-friendly interface and robust features make it a top choice for many users.
Understanding The Primary Bar
The Primary Bar in Divi WordPress is a crucial element for your website. It serves as the main navigation area, guiding visitors through your site. Knowing how to edit it can enhance your site’s usability and appearance.
Purpose Of The Primary Bar
The Primary Bar serves several key functions:
- Provides easy navigation for visitors.
- Displays important links prominently.
- Enhances the overall look of your website.
It’s essential to understand the purpose of this bar to make effective edits.
Default Settings
Divi WordPress comes with default settings for the Primary Bar. These settings include:
| Setting | Description |
|---|---|
| Background Color | Default is white |
| Font Style | Default is standard |
| Menu Alignment | Default is left-aligned |
Understanding these defaults helps you know what to change to suit your needs.
Preparing For Editing
Preparing to edit the primary bar in Divi WordPress requires careful steps. This ensures your website remains intact and functional. Follow these steps to make the process smooth and efficient.
Backup Your Website
Before making any changes, always backup your website. This safeguards your data and design.
- Go to your WordPress dashboard.
- Navigate to Tools and select Export.
- Choose All Content and click the Download Export File button.
You can also use a plugin for backups. Popular choices include UpdraftPlus and BackupBuddy. These plugins provide easy backup and restore options.
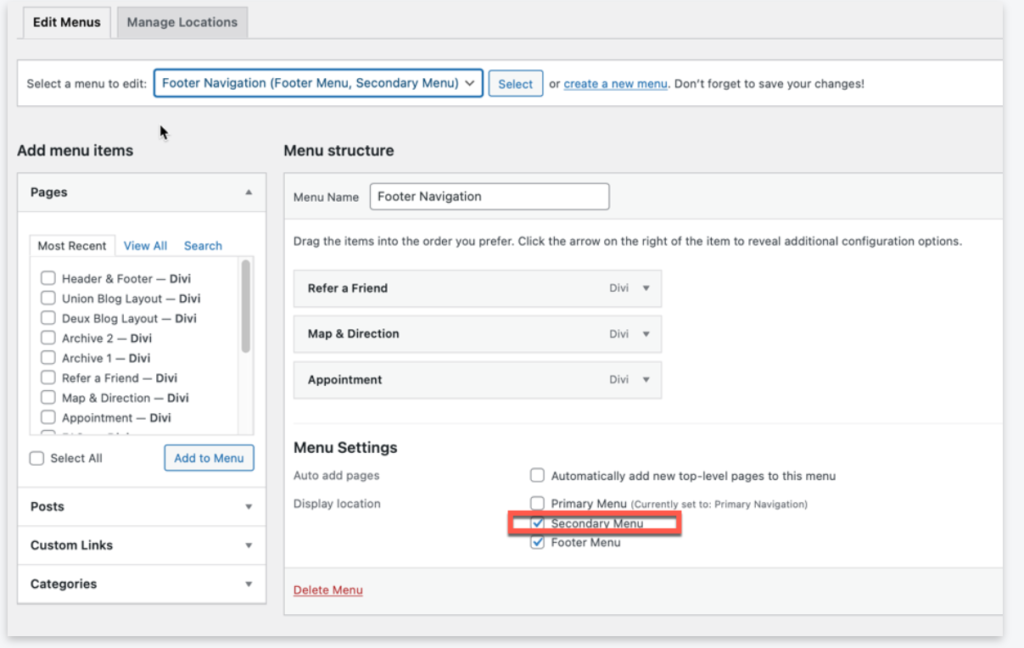
Accessing The Divi Theme Customizer
Next, access the Divi Theme Customizer. This is where you will edit the primary bar.
- Log in to your WordPress dashboard.
- Navigate to Appearance and select Customize.
- In the Customizer, find the Header & Navigation section.
- Select Primary Menu Bar.
Here, you can make various changes. Adjust the menu height, text color, and background color. Use the preview to see changes in real-time.
Once satisfied, click the Publish button to save your changes. Your primary bar is now customized.
Credit: divinotes.com
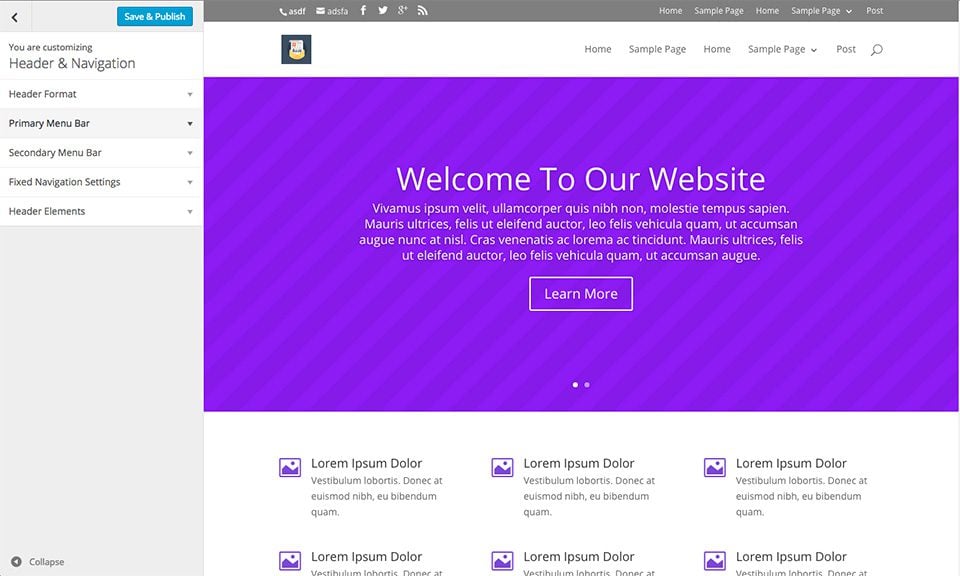
Customizing The Primary Bar
The Primary Bar in Divi WordPress is the topmost section of your website. This bar is crucial for navigation and branding. Customizing it helps create a unique look. You can change its background color and adjust the font styles. Let’s see how you can do this.
Changing Background Color
First, go to your WordPress dashboard. Navigate to Divi and then to Theme Customizer. Here, select Header & Navigation. Under this section, choose Primary Menu Bar.
You will see an option for Background Color. Click on it to open the color picker tool. Choose your desired color. This change will reflect immediately on your site. Click Save & Publish to make it permanent.
Adjusting Font Styles
To adjust the font styles, stay in the Primary Menu Bar settings. Look for the Menu Text section. Here, you can change the font style, size, and color.
Choose a font that matches your brand. Adjust the size to ensure readability. You can also change the font color. Click on the color picker tool to choose a new color. Make sure to click Save & Publish once you are satisfied.
Here is a simple table to summarize the steps:
| Action | Path |
|---|---|
| Change Background Color | Divi > Theme Customizer > Header & Navigation > Primary Menu Bar > Background Color |
| Adjust Font Styles | Divi > Theme Customizer > Header & Navigation > Primary Menu Bar > Menu Text |
By following these steps, you can customize your Primary Bar. This adds a touch of uniqueness to your website.
Adding Custom Elements
Editing the primary bar in Divi can enhance your website’s user experience. Adding custom elements like icons and buttons can make your site more interactive and visually appealing. This guide will help you add these elements with ease.
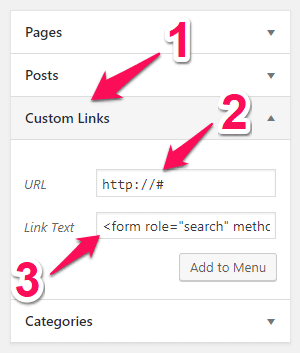
Incorporating Icons
Icons can make your website more engaging. You can add icons to the primary bar using Divi’s built-in options. Start by going to the Divi Theme Customizer. Select the Header & Navigation section.
Next, choose the Primary Menu Bar option. Here, you can add icons to your menu items. Simply select the icon you want to use from the icon library. Save your changes to see the icons on your primary bar.
Adding Buttons
Buttons can enhance navigation and call-to-action features. To add a button to the primary bar, go to the Divi Theme Builder. Create or edit a header template.
Add a button module to the primary bar area. Customize the button text, color, and style to match your site’s design. Save your changes and preview your site to see the new button in action.
Enhancing Responsiveness
Enhancing the responsiveness of your website’s primary bar in Divi WordPress is crucial. It ensures that your site looks great on all devices. Users access websites from various devices, so a responsive design is necessary. This blog section will guide you on how to make mobile and tablet view adjustments for the primary bar in Divi WordPress.
Mobile View Adjustments
First, open your WordPress dashboard. Navigate to Divi and click on Theme Customizer. Select the “Header & Navigation” option, then click on “Primary Menu Bar”. You will see several settings to adjust.
Focus on reducing the height of the primary bar. This will make it fit better on small screens. Next, change the font size of the menu items. Smaller text ensures readability on mobile devices.
To adjust the spacing, use the “Menu Item Padding” option. Reduce the padding to prevent the menu items from looking crowded. Test the changes by previewing your site on a mobile device. Make further adjustments if needed to ensure a clean and functional look.
Tablet View Adjustments
Tablet view adjustments are similar to mobile view but require more attention to detail. In the Theme Customizer, go to the “Primary Menu Bar” settings again.
Adjust the height to ensure it does not take up too much screen space. Set the font size slightly larger than the mobile view, as tablets have bigger screens. Use the “Menu Item Padding” option to fine-tune the spacing between items.
Preview your site on a tablet to check the responsiveness. Ensure the primary bar looks balanced and functional. Make any necessary tweaks to improve the user experience on tablet devices.
Testing Changes
Testing changes is a crucial step in editing the primary bar in Divi WordPress. Ensuring your changes look good and function properly across all platforms is essential. Let’s dive into how to effectively test your edits.
Previewing In Different Browsers
Make sure to preview your changes in multiple browsers. Open your website in Chrome, Firefox, Safari, and Edge. This helps you see how the primary bar looks in each one. Browsers can display elements differently. Checking across various browsers ensures consistency.
Ensuring Compatibility
Your primary bar should be compatible with different devices. Test it on desktops, tablets, and smartphones. Use browser developer tools to simulate these devices. This helps you understand how your edits look on different screen sizes. Make sure buttons and links work properly. Check for responsiveness and ease of use.
Finalizing And Saving Edits
After making changes to the Primary Bar in Divi, it’s crucial to save your work correctly. This ensures that all customizations appear on your WordPress site. Here’s how to finalize and save edits efficiently.
Saving Customizations
Once you’re satisfied with your changes, click the green checkmark in the Divi Builder. This saves your customizations.
Remember, the green checkmark is located in the lower-right corner of the Divi settings panel. Clicking this checkmark ensures your adjustments are stored.
Publishing Changes
After saving, you need to publish your changes. This makes your edits visible on your live site.
To do this, go to the top right of the WordPress dashboard and click the blue ‘Publish’ button. This is essential for your edits to take effect.
Here’s a quick summary of the steps:
- Click the green checkmark in Divi Builder.
- Go to the WordPress dashboard.
- Click the blue ‘Publish’ button.
These steps ensure your customizations are saved and published. Visitors will see your updated Primary Bar on your site.
Troubleshooting Common Issues
Editing the primary bar in Divi WordPress can be easy. But sometimes, you might face challenges. These issues can be frustrating. This section will help you fix common problems. Let’s dive into how you can troubleshoot these issues.
Reverting To Default Settings
If your primary bar looks odd, you might want to revert to default settings. This is a quick fix for many problems. Follow these simple steps:
- Go to your WordPress dashboard.
- Navigate to Divi > Theme Customizer.
- Click on “Header & Navigation”.
- Select “Primary Menu Bar”.
- Click on “Reset” to revert to default settings.
Reverting to default settings can solve many design issues. This step can save you time and effort.
Finding Support And Resources
If you are still facing issues, you can find help. There are many resources available online. Here are some useful options:
- Divi Documentation: The official Divi documentation is a great place to start. It has detailed guides and tutorials.
- Divi Community: Join Divi user groups and forums. These communities are helpful and supportive.
- Divi Support: Contact Divi support for professional help. They can assist you with specific issues.
Using these resources can help you solve most problems. Don’t hesitate to reach out for help.
Credit: www.elegantthemes.com
Frequently Asked Questions
How Do I Access The Primary Bar Settings In Divi?
Go to the WordPress Dashboard. Navigate to Divi > Theme Customizer > Header & Navigation.
Can I Change The Color Of The Primary Bar In Divi?
Yes, you can. In the Theme Customizer, select Header & Navigation > Primary Menu Bar.
How To Adjust The Height Of The Primary Bar In Divi?
You can adjust the height in Divi > Theme Customizer > Header & Navigation > Primary Menu Bar.
Is It Possible To Add A Logo To The Primary Bar?
Yes, you can add a logo. Go to Divi > Theme Options > General > Logo.
Can I Change The Font Style Of The Primary Bar?
Yes, you can. In the Theme Customizer, go to Header & Navigation > Primary Menu Bar > Font.
How Do I Make The Primary Bar Sticky?
Enable the sticky option in Divi > Theme Customizer > Header & Navigation > Fixed Navigation Settings.
Can I Add Social Media Icons To The Primary Bar?
Yes, you can add social icons. Go to Divi > Theme Customizer > Header & Navigation > Header Elements.
How To Remove The Primary Bar In Divi?
You can hide it in Divi > Theme Customizer > Header & Navigation > Header Format.
Can I Customize The Dropdown Menu In The Primary Bar?
Yes, customize it in Divi > Theme Customizer > Header & Navigation > Dropdown Menu.
How To Change The Alignment Of Menu Items In The Primary Bar?
Change alignment in Divi > Theme Customizer > Header & Navigation > Primary Menu Bar > Menu Text Alignment.
Conclusion
Editing the primary bar in Divi is straightforward with these steps. Customize your website’s look easily. Follow the guide to enhance your site’s navigation. Remember, a well-designed primary bar improves user experience. Experiment with colors, fonts, and layouts. Keep your site unique and functional.
Happy editing!